Category Archives: instruction

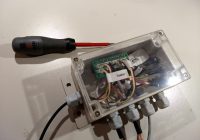
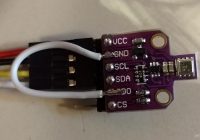
Neue Platine (v2) für Raspberry Zero

Es gibt eine großartige Neuigkeit! Michael Drewitz hat die vergangenen Monate damit verbracht eine neue HoneyPi Platine zu entwerfen. Sie ist aus eurem Feedback entstanden. Generell ist es für den HoneyPi Versuchsaufbau nicht notwendig aufwendige Lötarbeiten zu verrichten oder eine Platine zu verwenden. Dies wird in diesem Beitrag erläutert. Jedoch vereinfacht die Platine das Anschließen der Sensoren durch… Read More »

The Homebuilt HoneyPi by Alexander

This series of articles shows a step-by-step instruction on how to build the HoneyPi using Grove connectors and all sorts of other tricks 😉 Table of contents Installation of HoneyPi in the housing Power supply 230V and solar Grove Adapter PCB Structure of the Weighing Frame Additional information on the following topics: Connection of cheap BME680 from Ebay… Read More »

Part 1: Installation of HoneyPi in a housing

type 158x90x65mm clear waterproof plastic That’s what it looks like when it’s done: Re 1: Total material costs for electronics with me approx. 64€ (+ possibly resulting forwarding expenses) Prize Amount Sum Type 15,50 € 1 15,50 € Raspi Zero reichelt Raspberry Pi Zero WH v.1.1, 1 GHz, 512 MB RAM, WLAN, BT 3,95 € 1 3,95 €… Read More »

Part 2: Power supply 230V & Solar

Power supply via 230V: The simplest and cheapest solution <10€; material for this usually already available at home: Idea for power supply in the outdoor area when 230V is available: Needed: Extension cable outdoor, price depending on length e.g. 10m 10€ Waterproof box: Richelt in red for 1,65€ or better quality in yellow for 4,50€ Mini-USB charger with… Read More »

Part 3: Adapter-LK for Grove connectors

Basics of the Grove connector system. Why Grove plugs? A table top assembly (almost) only with finished Grove modules. Solderless connector system This greatly reduces the chance of miswiring. No forgotten pull-up / pull-down resistors… A repair / component exchange extension / troubleshooting at the apiary is also much easier due to the “reverse polarity protected” plugging. If… Read More »

Part 4: Assembly of the scale frame

Here I have chosen the following structure: One screen printing plate each at the top and bottom. It is screwed onto a 100x200x10mm steel or aluminium plate for load distribution. Between the load distribution plates there is a spacer plate on each side which is adapted to the bore pattern of the load cell. At each of the… Read More »

Building a scale frame

Many beekeepers see the greatest challenge in the construction of the beehive’s weighing frame. As our picture gallery shows, there are many racks suitable for reproduction. In addition, our Facebook group also allows an exchange/trade among each other. In this article I would like to introduce the possibility to build your own scale rack. Otherwise there is the… Read More »

Calibrating load cells

Different load cells can be connected to the architecture selected by us. For this reason, it is possible to store a calibration for each connected scale in the maintenance mode. Since version v1.0 a guided calibration mode has been introduced. This simplifies calibration so that the text below is no longer necessary. The calibration consists of two values.… Read More »